20 Pumpkin Carving | Spooky Designs for Halloween
Looking for 20 pumpkin carving ideas that are fun, creative, and perfect for Halloween? Pumpkin carving is one of the most enjoyable fall traditions, and there are endless ways to turn an ordinary pumpkin into a spooky, cute, funny, or artistic decoration. Whether you are carving with kids, decorating your front porch, or creating a Halloween centerpiece, these ideas include simple designs for beginners and more detailed options for experienced carvers.
From classic jack-o’-lantern faces to ghosts, cats, bats, monsters, and intricate patterns, these pumpkin carving ideas can help you create decorations that stand out all season long.
20 Pumpkin Carving Ideas:
1. Classic Jack-O’-Lantern

Start with the timeless Halloween favorite: a traditional jack-o’-lantern. Carve triangle eyes, a small triangle nose, and a wide toothy smile.
Details:
- Difficulty: Easy
- Style: Traditional
- Best for: Beginners and families
- Pumpkin size: Medium or large
- Lighting: LED candle
Try changing the expression to make your pumpkin look happy, spooky, surprised, or mischievous.
2. Scary Monster Pumpkin

Create a creepy monster with oversized eyes, sharp teeth, and an exaggerated mouth. Uneven teeth can make the finished design look even more frightening.
Make It Extra Spooky
Add wrinkles around the eyes and forehead. A larger pumpkin gives you more space for facial details.
3. Cute Cat Pumpkin

Cat lovers can create an adorable pumpkin by carving pointed ears, round eyes, whiskers, and a tiny nose.
Design options:
- Black-cat-inspired face
- Sleepy cat
- Playful kitten
- Witch cat
- Grinning Halloween cat
This design works particularly well with other Halloween decorations featuring bats and stars.
4. Ghost Pumpkin

A ghost is one of the easiest Halloween shapes to carve. Create a flowing outline with two eyes and a small mouth.
Add a Haunted Effect
Carve several tiny stars or circles around the ghost to create the appearance of a floating nighttime scene.
5. Spiderweb Pumpkin

Turn your pumpkin into a creepy centerpiece with a large spiderweb design.
Start with several curved lines extending from the center, then connect them with smaller curved sections.
Add a Spider
Carve a small spider in the middle or near the bottom of the web. For a simpler version, create a spider silhouette instead of detailed legs.
6. Bat Silhouette Pumpkin

A flying bat design instantly creates a Halloween atmosphere. Carve one large bat or a group of bats flying across the pumpkin.
Best details to add:
- Pointed wings
- Small ears
- Curved wing edges
- Tiny stars
- Crescent moon
A dark porch makes the illuminated bat shapes especially noticeable.
Read next: 20 Pumpkin Painting Easy
7. Witch Face Pumpkin

Create a classic witch face with a long nose, narrow eyes, and a crooked smile.
Complete the Witch Theme
Add a pointed witch hat, curly hair, stars, or a moon around the face. You can make the expression funny instead of frightening for a kid-friendly design.
8. Skeleton Pumpkin
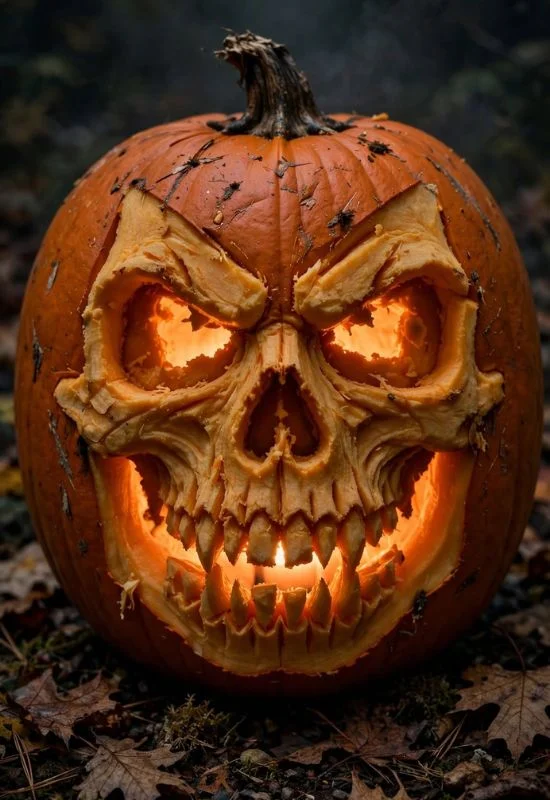
Carve a skeleton-inspired face using hollow eyes, a nose opening, and a wide mouth filled with teeth.
Focus on the Mouth
Create several rectangular teeth instead of one continuous smile. Keep enough pumpkin between the teeth so the design remains strong.
9. Pumpkin With a Crescent Moon

A crescent moon design is perfect if you prefer a magical Halloween aesthetic. Carve a large moon surrounded by stars and small clouds.
Use different carving depths to create subtle variations in how much light shines through the design.
10. Funny Face Pumpkin

Not every pumpkin needs to look scary. Create a goofy face with oversized eyes, a crooked mouth, giant teeth, or raised eyebrows.
Funny expressions to try:
- Surprised
- Sleepy
- Laughing
- Confused
- Silly grin
- Tongue sticking out
This is a fun choice for family Halloween decorations.
11. Haunted House Pumpkin
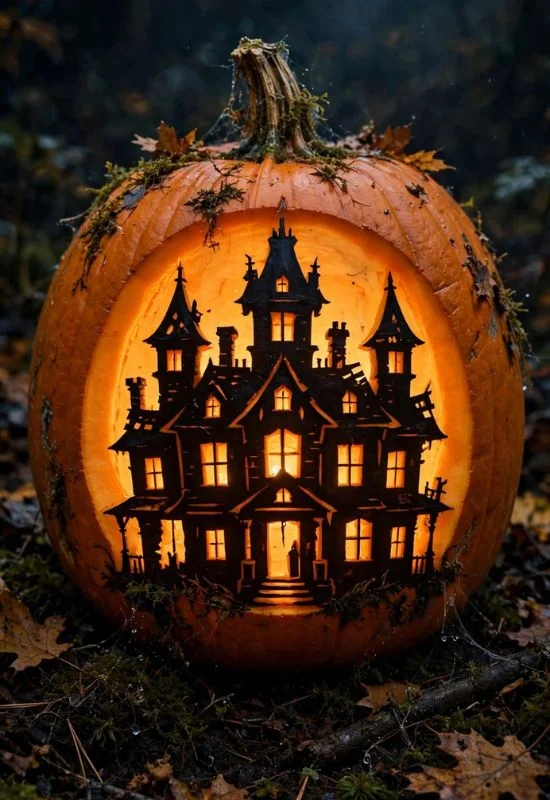
Turn your pumpkin into a miniature haunted house scene. Carve a crooked house with windows, a door, trees, bats, and a moon.
Create More Depth
Use larger shapes for the house and smaller silhouettes for distant trees and bats. This creates a more detailed scene without requiring every section to be intricately carved.
12. Eyeball Pumpkin

Create a giant creepy eyeball by carving a circular eye with an iris and pupil.
Try Multiple Eyes
Instead of one large eye, carve several small eyes around the pumpkin. This creates an unusual monster-inspired effect.
13. Owl Pumpkin

Carve a cute or mysterious owl using large circular eyes, a pointed beak, and feather patterns.
Make the Eyes Stand Out
Large eyes are the key feature. Add layered feather shapes around the face for a more detailed woodland-inspired design.
14. Skull and Crossbones Pumpkin

For a pirate-inspired Halloween decoration, carve a skull face with crossed bones underneath.
Add extra details:
- Pirate hat
- Eye patch
- Cracked skull lines
- Small stars
- Treasure-inspired symbols
This design can become a fun centerpiece for a Halloween party.
15. Floral Pumpkin Carving

For something different, create an elegant floral pattern. Carve large flowers, leaves, vines, and curved botanical shapes.
Keep Floral Designs Strong
Choose larger petals instead of extremely thin details. Leave sufficient pumpkin between each shape to reduce the chance of delicate sections breaking.
16. Geometric Pattern Pumpkin

Skip faces completely and create a modern pumpkin with geometric shapes.
Try:
- Diamonds
- Triangles
- Circles
- Zigzags
- Checkerboard patterns
- Repeating lines
A geometric pumpkin can look stylish alongside neutral fall decorations.
17. Scarecrow Pumpkin

Create a cheerful scarecrow face with button-style eyes, a triangular nose, a stitched mouth, and a carved hat.
Add Autumn Details
Surround the face with leaves, corn stalks, or simple harvest symbols for a cozy fall appearance.
18. Creepy Smile Pumpkin

For a simple but spooky effect, focus entirely on the mouth. Create a giant curved smile with uneven teeth.
Pair the mouth with narrow eyes or leave the upper portion of the pumpkin mostly blank for a mysterious appearance.
19. Animal Paw Print Pumpkin

Animal lovers can carve paw prints across the pumpkin. Create one large paw print or several smaller ones wrapping around the surface.
Customize the Design
Use cat paws, dog paws, bear prints, or another animal-inspired pattern. This is an easy option for beginners who want something different from a traditional face.
20. Intricate Halloween Scene

For experienced carvers, combine several Halloween elements into one detailed design. Create a haunted house, moon, bats, trees, ghosts, and stars in a single scene.
Plan Before You Carve
Draw the entire design first. Begin with the largest shapes and gradually work toward the smaller details. This makes complex carving much easier to manage.
How to Choose a Pumpkin for Carving
Look for a Firm Pumpkin
Choose a pumpkin that feels solid and has no significant soft spots. A firm pumpkin is easier to cut and generally holds its shape better.
Pick the Right Shape
Round pumpkins are ideal for traditional faces. Tall pumpkins work well for characters, while flatter pumpkins can provide a wider canvas for detailed scenes.
Check the Surface
A relatively smooth surface makes it easier to transfer patterns and create clean outlines.
Pumpkin Carving Supplies
Basic Tools
You will need:
- Fresh pumpkin
- Pumpkin carving saw
- Spoon or pumpkin scoop
- Marker
- Newspaper or table covering
- Small carving tools
- LED light
Optional Supplies
For advanced projects, consider using carving templates, detail tools, small drills, or specialized pumpkin carving kits.
How to Carve a Pumpkin
Step 1: Prepare Your Workspace
Cover your work surface before beginning. Pumpkin seeds, pulp, and scraps can quickly make a mess.
Step 2: Open the Pumpkin
Carefully cut an opening around the stem. Keep your cutting tool controlled and work slowly.
Step 3: Remove the Seeds and Pulp
Scoop out the seeds and stringy material. Scrape the inside until the pumpkin is relatively clean.
Step 4: Transfer Your Design
Draw the design directly onto the pumpkin or use a template. Keep important details spaced far enough apart.
Step 5: Carve the Large Shapes
Start with the biggest sections before moving on to small details.
Step 6: Refine the Design
Clean the edges and remove small pieces that remain attached. Fine details can be added once the main pattern is complete.
Step 7: Add Lighting
Place a battery-powered LED light inside your pumpkin to illuminate the carved design.
Easy Pumpkin Carving Tips
Start With Simple Designs
If you are a beginner, choose a classic face, ghost, cat, moon, or geometric pattern.
Keep Sections Thick
Extremely thin pieces can break while you are carving. Leave enough pumpkin between delicate sections.
Use a Template
A template can make detailed designs much easier, particularly for beginners.
Take Your Time
Slow and controlled cuts are safer and usually produce cleaner results than trying to finish quickly.
Pumpkin Carving Ideas for Kids
Simple Faces
Kids can help draw funny expressions, choose colors for the design, and scoop out the pumpkin while an adult handles sharp carving tools.
Easy Shapes
Stars, hearts, circles, moons, and simple animal faces are great choices for family projects.
Creative Pumpkin Display Ideas
Front Porch Arrangement
Place pumpkins of different sizes near your front door. Combine carved faces with uncarved mini pumpkins and autumn foliage.
Staircase Display
Create a line of illuminated pumpkins along outdoor steps while keeping walkways clear and safe.
Halloween Table Decor
Small carved pumpkins can become a fun centerpiece surrounded by artificial leaves and seasonal decorations.
Frequently Asked Questions
What is the easiest pumpkin carving design?
Classic jack-o’-lantern faces, ghosts, simple cats, moons, and basic geometric patterns are among the easiest designs for beginners.
How long does pumpkin carving take?
A simple design may take around 20 to 40 minutes, while detailed scenes can take considerably longer depending on the pumpkin and carving technique.
Can I carve a pumpkin with a regular knife?
A pumpkin carving saw or specialized carving tool is generally easier to control for this task. Always use sharp tools carefully and keep children away from the cutting process.
How can I make my carved pumpkin last longer?
Keep the pumpkin in a cool location away from direct sunlight and excessive heat. Avoid unnecessary handling and moisture.
Should children carve pumpkins?
Children can participate in choosing designs, drawing patterns, and removing seeds and pulp, but adults should handle sharp carving tools and supervise the activity.
What should I put inside a carved pumpkin?
Battery-operated LED candles or lights are convenient choices for illuminating carved pumpkins without using an exposed flame.
Can I use a small pumpkin for detailed carving?
Yes. Small pumpkins can be attractive for simple patterns, but larger pumpkins generally provide more space for intricate designs.