20 Pumpkin Carving Designs | Creative Halloween Decorations
Pumpkin carving is one of the most exciting fall traditions, but you don’t have to stick with the same classic jack-o’-lantern face every year. From spooky expressions and creepy creatures to elegant patterns and playful characters, there are endless pumpkin carving designs to try.
Whether you’re decorating your front porch, planning a Halloween party, or looking for a creative weekend craft, these ideas offer something for every skill level. Choose a simple design if you’re new to carving, or challenge yourself with detailed patterns for a statement pumpkin.
20 Pumpkin Carving Designs | Creative Halloween Decorations:
1. Classic Jack-O’-Lantern Face

The classic jack-o’-lantern remains one of the most recognizable pumpkin carving designs.
Create a Traditional Expression
Carve triangle eyes, a small triangle nose, and a wide smiling mouth. Change the shape of the eyes or teeth to give your pumpkin a unique personality.
2. Spooky Scary Face

Create a frightening pumpkin with narrow eyes, a crooked nose, and jagged teeth.
Make the Expression Dramatic
Uneven features can make the pumpkin look even creepier. Add pointed teeth and angled eyebrows for an intense Halloween effect.
3. Cute Cat Pumpkin
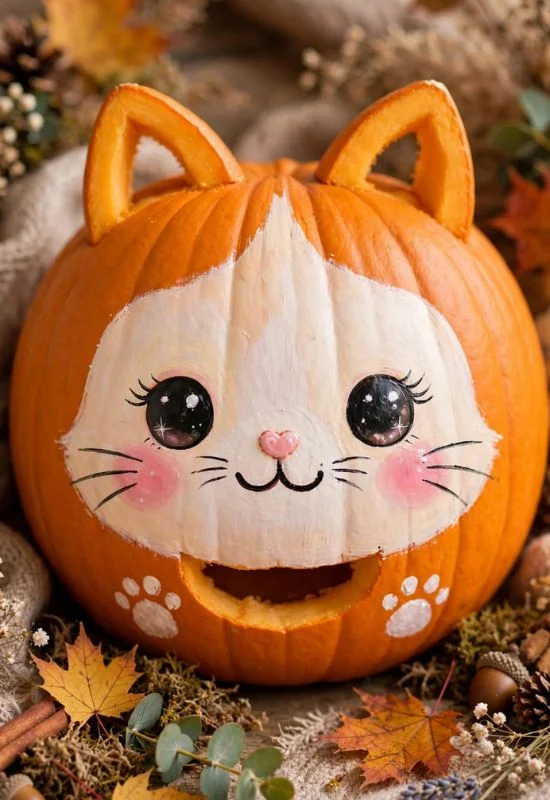
Cat lovers can transform a pumpkin into an adorable feline character.
Add Pointed Ears
Carve triangular ears near the top and create round eyes, a tiny nose, and whiskers. Black paint can add extra details around the carved features.
4. Witch Pumpkin

A witch-themed pumpkin is perfect for a classic Halloween display.
Create a Witch Face
Carve a long nose, narrow eyes, and a crooked smile. Finish the look with a miniature witch hat placed on top.
5. Ghost Pumpkin

A ghost design can be spooky while still looking simple and stylish.
Use a Simple Silhouette
Carve large hollow eyes and an open mouth into a white or pale pumpkin. Add a flowing ghost shape with additional cutouts if you want more detail.
6. Spiderweb Pumpkin

Spiderweb patterns create a creepy and decorative pumpkin without requiring a traditional face.
Carve the Web Carefully
Start with several straight lines radiating outward, then connect them with curved lines. Add a small plastic or painted spider for extra Halloween atmosphere.
7. Bat Pumpkin

A bat silhouette is another fun option for Halloween night.
Create Sharp Wing Shapes
Use a stencil to outline a bat across the pumpkin. Cut the larger sections carefully so the shape remains recognizable.
8. Haunted House Pumpkin
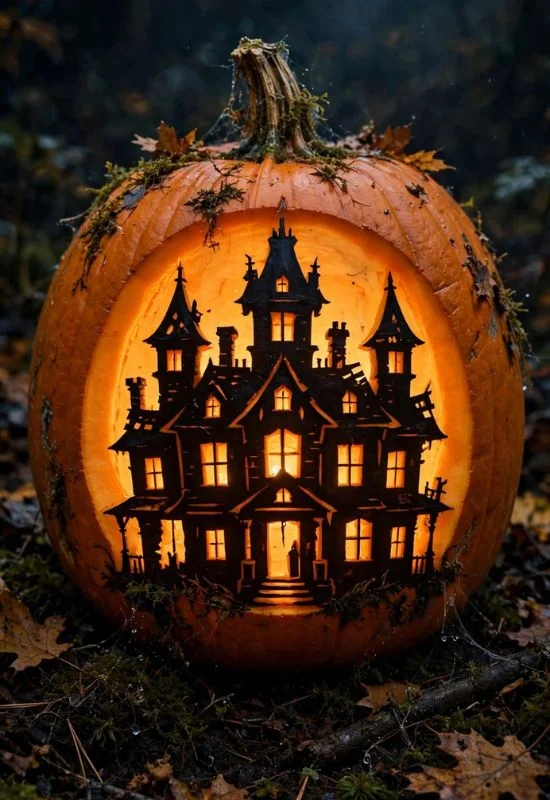
Turn your pumpkin into a miniature haunted scene.
Build a Spooky Landscape
Carve a haunted house silhouette with windows, a crooked roof, trees, and a moon. Place a small LED light inside to make the scene glow.
9. Moon and Stars Design

For a magical rather than scary pumpkin, try a celestial pattern.
Create a Night-Sky Effect
Carve a crescent moon surrounded by stars. Use different star sizes to make the design more interesting when illuminated.
10. Frankenstein Pumpkin

Give your pumpkin a monster makeover inspired by Frankenstein.
Add Recognizable Features
Use square-shaped eyes, a wide mouth, scars, and simple bolts on the sides. Green paint can make the design even more recognizable.
Read Next: 20 Pumpkin Carving Ideas For Kids
11. Skeleton Face Pumpkin
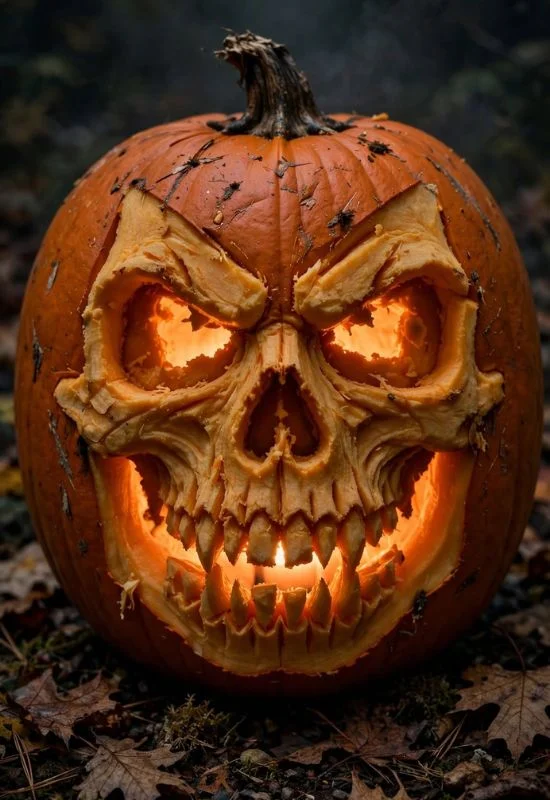
A skeleton-inspired pumpkin makes an eerie Halloween decoration.
Focus on the Teeth
Create hollow eyes and a detailed row of teeth. Keep the nose small and triangular to maintain the skull-like appearance.
12. Scary Clown Pumpkin

For a truly creepy Halloween display, try a sinister clown face.
Emphasize the Smile
Carve large eyes and an exaggerated mouth. A few decorative cuts around the cheeks can create a dramatic clown expression.
13. Owl Pumpkin
An owl design adds a mysterious woodland feel to your Halloween decor.
Make the Eyes the Focus
Carve two large circular eyes, a small beak, and simple feather patterns. The contrast between large and small shapes makes this design visually striking.
14. Dinosaur Pumpkin

A dinosaur pumpkin is a playful choice for children and dinosaur fans.
Create a Friendly Dinosaur
Carve large eyes, a wide mouth, and simple teeth. Add paper spikes or painted details after carving for a three-dimensional effect.
15. Pumpkin with Geometric Patterns

You don’t need to carve a face to make a beautiful pumpkin.
Experiment with Shapes
Try diamonds, triangles, circles, zigzags, or repeating lines. A geometric pumpkin can look modern and sophisticated on a fall porch.
16. Floral Pumpkin Design

Flowers can transform a pumpkin into an elegant seasonal decoration.
Combine Flowers and Vines
Carve large petals surrounded by leaves and curved vines. Use different opening sizes to create interesting shadows when the pumpkin is lit.
17. Vampire Pumpkin

Create a playful vampire face for a classic Halloween theme.
Add Fangs and a Widow’s Peak
Carve pointed teeth, sharp eyebrows, and a dramatic mouth. A black cape or small costume accessories can complete the character.
18. Pumpkin Monster with Multiple Eyes

Create your own imaginative monster by giving the pumpkin several eyes.
Mix Eye Shapes
Use round, oval, and triangular eyes to make the character look unusual. Add a silly mouth or small teeth for a playful monster.
19. Elegant Lace-Inspired Pumpkin

For sophisticated fall decor, create a delicate lace-style pattern.
Use a Detailed Stencil
Choose repeating floral, mandala, or lace patterns. Carefully carve small sections to create a beautiful glowing effect.
20. Personalized Initial Pumpkin

Make your pumpkin special by carving a large initial or monogram.
Decorate Around the Letter
Add stars, leaves, hearts, dots, or small geometric patterns around the initial. This is a great idea for personalized porch decorations or Halloween parties.
Tips for Better Pumpkin Carving Designs
Choose a pumpkin with a firm surface and a flat base so it stays stable while you’re working. A medium-to-large pumpkin usually provides more space for detailed designs.
Before cutting, clean the pumpkin and remove the seeds and stringy interior. Draw your design with a washable marker or attach a stencil before using a carving tool.
For intricate pumpkin carving designs, start with the smallest details only after completing the larger cuts. This reduces the chance of accidentally breaking delicate sections.
Battery-powered LED lights are a practical option for illuminating carved pumpkins, especially for displays around children or pets.
How to Choose the Right Pumpkin Carving Design
Beginners should start with large, simple shapes such as classic faces, ghosts, cats, or stars. These designs are easier to transfer and carve.
If you’re more experienced, try haunted houses, floral patterns, lace-inspired designs, or detailed skeleton faces. A stencil can make complicated designs much easier to recreate.
You can also combine multiple styles. For example, create a spooky cat with a moon and stars in the background, or combine a geometric border with a classic jack-o’-lantern face.
Frequently Asked Questions
What are the easiest pumpkin carving designs?
Classic jack-o’-lantern faces, ghosts, cats, stars, and simple geometric patterns are among the easiest designs for beginners.
How do I transfer a design onto a pumpkin?
You can draw directly onto the pumpkin with a washable marker or use a printed stencil. Secure the stencil and trace the design before carving.
What tools are best for pumpkin carving?
A pumpkin carving kit with a small serrated saw, scraper, and detail tools works well. For intricate designs, smaller carving tools can provide better control.
How early can I carve a pumpkin?
A carved pumpkin generally lasts longer when kept cool and dry. For the freshest appearance, many people carve their pumpkins only a few days before Halloween.
Can I use a fake pumpkin for carving?
Yes. Foam or craft pumpkins can be carved and reused year after year. They are especially useful for indoor or long-term Halloween decorations.
How can I make my carved pumpkin glow?
Place a battery-powered LED light inside the pumpkin. It provides a bright glow without the risks associated with an open flame.
What should beginners avoid when carving?
Avoid extremely thin sections, complicated tiny details, and designs with too many disconnected pieces. Start with bold shapes and gradually work toward more detailed patterns.