29 Charms Ideas DIY | Creative Handmade Accessories
DIY charms are a fun and creative way to personalize jewelry, keychains, backpacks, handbags, and phone accessories. Whether you enjoy working with resin, polymer clay, beads, wood, or recycled materials, handmade charms let you create one-of-a-kind pieces that reflect your personality and style. They also make thoughtful gifts for friends and family and are perfect for craft fairs or small handmade businesses.
From cute food charms and floral pendants to personalized letter charms and glitter resin designs, there are endless ways to express your creativity. Many of these DIY charm ideas require only a few basic craft supplies, making them suitable for beginners as well as experienced crafters.
In this guide, you’ll find 29 DIY charm ideas that are stylish, affordable, and easy to customize. These handmade charms, polymer clay charms, resin charms, beaded charms, and cute DIY jewelry charms are perfect for bracelets, necklaces, keychains, zipper pulls, and phone charms.
1. Personalized Initial Resin Charm

Why It’s Special
A personalized initial resin charm is a timeless accessory that adds a custom touch to bracelets, necklaces, keychains, or handbags. Encasing a letter in clear resin with glitter, dried flowers, or gold flakes creates a stylish keepsake that’s both elegant and meaningful. It’s also a wonderful handmade gift for birthdays, holidays, or special occasions.
Materials Needed
Alphabet resin mold, epoxy resin, hardener, glitter, dried flowers, gold foil, mixing cups, stirring sticks, jump ring.
How to Make It
Mix the epoxy resin according to the manufacturer’s instructions. Pour a thin layer into the alphabet mold, add glitter or decorative elements, then fill the mold completely with resin. Remove bubbles with a heat tool or toothpick. Allow the resin to cure fully before removing it from the mold and attaching a jump ring.
Personalization Tips
Use the recipient’s initials, birth flower colors, favorite glitter shades, or tiny birthstones to make each charm unique.
Estimated Cost
$2–5
Skill Level
Beginner
Best Occasion
Birthday gifts, friendship bracelets, handmade jewelry, or personalized keychains.
2. Polymer Clay Fruit Charm
Why It’s Special
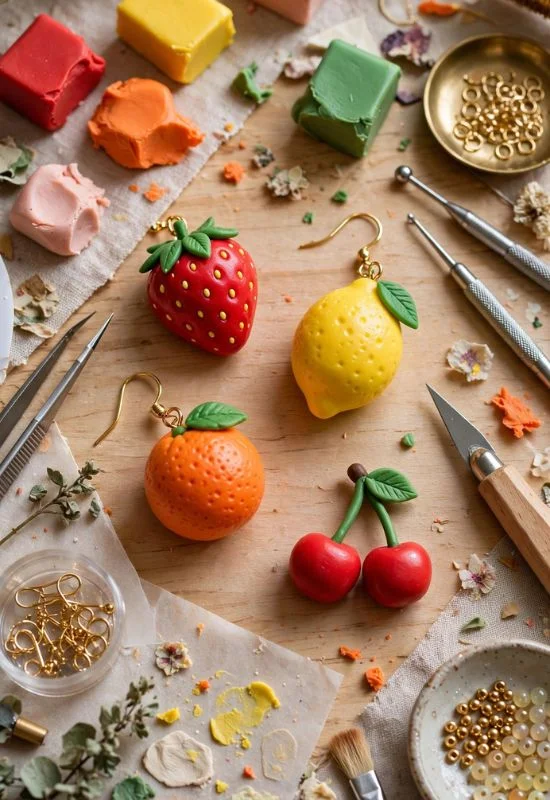
Polymer clay fruit charms are colorful, playful, and perfect for adding personality to bracelets, earrings, backpacks, or phone straps. From tiny strawberries and lemons to watermelon slices and cherries, these miniature charms are fun to create and suitable for crafters of all ages. They’re also excellent handmade gifts and craft fair items.
Materials Needed
Polymer clay, craft knife, dotting tool, eye pins, baking tray, oven, glaze, jewelry pliers.
How to Make It
Condition the clay until soft, then sculpt your favorite fruit shape using simple tools. Insert an eye pin before baking according to the clay manufacturer’s instructions. After cooling, apply a glossy glaze for a realistic finish and attach a jump ring.
Personalization Tips
Create favorite fruits, add smiling faces for a kawaii style, or mix several fruit charms into one matching jewelry set.
Estimated Cost
$1–4
Skill Level
Beginner
Best Occasion
Bracelets, earrings, phone charms, or handmade gifts.
3. Dried Flower Resin Charm

Why It’s Special
Dried flower resin charms capture the natural beauty of real flowers in a crystal-clear finish. Every charm is unique, making it an elegant accessory for necklaces, bookmarks, keychains, or bracelets. These timeless pieces are especially popular for spring-inspired jewelry and handmade gifts.
Materials Needed
UV or epoxy resin, dried flowers, silicone resin mold, UV lamp (for UV resin), tweezers, jump rings.
How to Make It
Pour a thin layer of resin into the mold before carefully arranging the dried flowers with tweezers. Fill the mold completely and cure the resin according to the instructions. Remove the finished charm and attach a jump ring.
Personalization Tips
Use birth flowers, wedding bouquet petals, or favorite flower colors for a sentimental keepsake.
Estimated Cost
$2–5
Skill Level
Beginner
Best Occasion
Mother’s Day, birthdays, weddings, or handmade jewelry.
4. Beaded Tassel Charm
Why It’s Special
A beaded tassel charm adds color, texture, and movement to handbags, keychains, bookmarks, or zipper pulls. Combining decorative beads with silky tassels creates a stylish accessory that’s easy to customize for any season or outfit.
Materials Needed
Embroidery floss or tassels, decorative beads, head pin, jump ring, jewelry pliers, scissors.
How to Make It
Thread decorative beads onto a head pin and attach the tassel securely beneath them. Form a loop at the top using jewelry pliers and connect the charm to a jump ring or lobster clasp.
Personalization Tips
Match bead colors to school colors, holidays, or favorite outfits for a coordinated look.
Estimated Cost
$2–4
Skill Level
Beginner
Best Occasion
Bag charms, zipper pulls, bookmarks, or gifts.
5. Mini Book Charm
Why It’s Special
Tiny book charms are perfect for book lovers, teachers, students, and writers. They add a literary touch to necklaces, bracelets, bookmarks, and keychains while allowing endless opportunities for customization.
Materials Needed
Cardstock, decorative paper, craft glue, eye pin, scissors, miniature printed pages, Mod Podge.
How to Make It
Fold miniature pages together and glue them inside a decorative cardstock cover. Insert an eye pin into the spine before sealing the book with glue. Finish by applying a thin layer of Mod Podge for extra durability.
Personalization Tips
Create miniature versions of favorite books or print custom titles featuring names or meaningful quotes.
Estimated Cost
$1–3
Skill Level
Beginner
Best Occasion
Teacher gifts, reader accessories, or book club favors.
6. Glitter Star Resin Charm
Why It’s Special
Sparkling star charms bring a magical touch to handmade jewelry and accessories. Filled with glitter, holographic flakes, or iridescent pigments, these resin charms shine beautifully in the light and appeal to both kids and adults.
Materials Needed
Star-shaped silicone mold, epoxy or UV resin, glitter, holographic flakes, mixing cups, jump rings.
How to Make It
Mix the resin thoroughly and stir in glitter or holographic flakes. Pour into the star mold, remove bubbles, and allow the resin to cure completely. Carefully remove the charm and attach a jump ring.
Personalization Tips
Layer different glitter colors or include tiny moons and stars for a celestial design.
Estimated Cost
$2–5
Skill Level
Beginner
Best Occasion
Bracelets, necklaces, Christmas ornaments, or party favors.
7. Wooden Heart Charm

Why It’s Special
A wooden heart charm offers a natural, rustic look that’s perfect for bracelets, keychains, gift tags, and necklaces. Lightweight and durable, it can be painted, engraved, or wood-burned to create a meaningful keepsake.
Materials Needed
Small wooden heart blank, sandpaper, acrylic paint or wood stain, wood-burning tool, jump ring, clear sealer.
How to Make It
Sand the wooden heart until smooth before painting, staining, or wood-burning your chosen design. Apply a clear protective sealer after the decoration dries and attach a jump ring through the pre-drilled hole.
Personalization Tips
Add initials, meaningful dates, tiny floral patterns, or inspirational words like “Hope” or “Love.”
Estimated Cost
$1–4
Skill Level
Beginner
Best Occasion
Valentine’s Day, weddings, friendship gifts, or keychains.
8. Polymer Clay Animal Charm
Why It’s Special
Cute animal charms are among the most popular DIY charm ideas because they’re fun, expressive, and easy to personalize. Tiny cats, dogs, pandas, foxes, and rabbits make adorable additions to bracelets, backpacks, earrings, and phone straps.
Materials Needed
Polymer clay, sculpting tools, eye pins, oven, glaze, jewelry pliers, acrylic paint (optional).
How to Make It
Shape the polymer clay into your favorite animal using sculpting tools for facial details and texture. Insert an eye pin before baking according to the manufacturer’s instructions. After cooling, apply a glossy glaze and attach a jump ring.
Personalization Tips
Create charms that resemble your pets, favorite wildlife, or add miniature accessories like bows, hats, or scarves.
Estimated Cost
$2–5
Skill Level
Beginner to Intermediate
Best Occasion
Bracelets, earrings, keychains, backpack charms, or handmade gifts.
9. DIY Seashell Charm
Why It’s Special
A seashell charm captures the beauty of the beach and makes a lovely keepsake for summer jewelry. Whether collected during a vacation or purchased from a craft store, seashells create elegant charms for necklaces, bracelets, anklets, and keychains. Their natural appearance makes every piece unique.
Materials Needed
Small seashells, jewelry drill or adhesive bails, jump rings, gold or silver findings, clear sealant.
How to Make It
Clean and dry the seashell thoroughly before drilling a small hole or attaching an adhesive bail. Apply a clear sealant for extra shine and durability, then connect the shell to a jump ring or chain.
Personalization Tips
Decorate with tiny pearls, initials, or beach-colored beads for a coastal-inspired design.
Estimated Cost
$2–5
Skill Level
Beginner
Best Occasion
Summer jewelry, beach vacations, or handmade gifts.
10. Rainbow Bead Charm
Why It’s Special
A rainbow bead charm adds bright colors and cheerful style to bracelets, backpacks, and zipper pulls. It’s simple to make and perfect for beginners, children, or anyone who enjoys colorful accessories.
Materials Needed
Colorful beads, jewelry wire, head pin, jump ring, jewelry pliers, scissors.
How to Make It
Arrange beads in rainbow order on a head pin or jewelry wire. Secure the end with a wrapped loop using pliers, then connect the finished charm to a jump ring.
Personalization Tips
Use birthstone-colored beads or favorite color combinations to create a personalized charm.
Estimated Cost
$1–3
Skill Level
Beginner
Best Occasion
Friendship bracelets, keychains, or kids’ crafts.
11. Mini Cupcake Polymer Clay Charm
Why It’s Special
Tiny cupcake charms are sweet, playful accessories that look adorable on bracelets, necklaces, earrings, or phone charms. Their colorful frosting and decorative toppings make them favorites among polymer clay enthusiasts.
Materials Needed
Polymer clay, sculpting tools, eye pins, oven, glaze, dotting tool.
How to Make It
Shape the cupcake base and frosting separately before combining them. Add tiny clay sprinkles or fruit decorations, insert an eye pin, bake according to the clay instructions, and finish with a glossy glaze.
Personalization Tips
Create cupcake flavors inspired by birthdays, holidays, or favorite desserts using different frosting colors.
Estimated Cost
$2–4
Skill Level
Beginner
Best Occasion
Birthday gifts, charm bracelets, or craft fairs.
Read Next: 27 Wedding Gifts For Guests DIY
12. Pressed Leaf Resin Charm
Why It’s Special
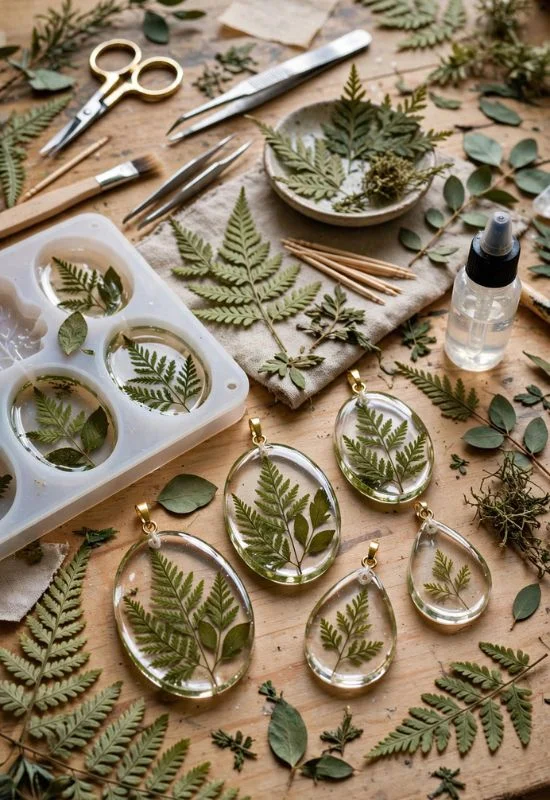
Pressed leaf resin charms preserve the beauty of nature inside crystal-clear resin. Each leaf has its own shape and texture, creating a unique handmade charm that pairs beautifully with necklaces, bookmarks, or keychains.
Materials Needed
Pressed leaves, epoxy or UV resin, silicone mold, tweezers, UV lamp (if needed), jump rings.
How to Make It
Place the pressed leaf into the resin mold and carefully pour resin over it until fully covered. Remove air bubbles, cure completely, then remove the charm from the mold and attach a jump ring.
Personalization Tips
Use leaves collected from meaningful places or combine tiny flowers with the leaf for extra detail.
Estimated Cost
$2–5
Skill Level
Beginner
Best Occasion
Nature-inspired jewelry, autumn crafts, or gifts.
13. Letter Bead Charm
Why It’s Special
Letter bead charms make personalized accessories that celebrate names, initials, or meaningful words. They’re simple to assemble and work well for bracelets, necklaces, backpacks, and zipper pulls.
Materials Needed
Alphabet beads, spacer beads, jewelry wire, head pins, jump rings, jewelry pliers.
How to Make It
Arrange the letter beads to spell a name or short word, then add decorative spacer beads. Secure the beads with a loop and attach the finished charm to a jump ring.
Personalization Tips
Spell inspirational words like “Hope,” “Smile,” or “Dream,” or use family initials.
Estimated Cost
$1–3
Skill Level
Beginner
Best Occasion
Friendship gifts, school accessories, or party favors.
14. Mini Envelope Charm

Why It’s Special
A miniature envelope charm symbolizes love, friendship, and heartfelt messages. It’s an adorable addition to charm bracelets, necklaces, or Valentine’s Day gifts.
Materials Needed
Cardstock, decorative paper, craft glue, tiny note paper, eye pin, scissors, Mod Podge.
How to Make It
Fold decorative paper into a tiny envelope and glue the edges securely. Insert a miniature handwritten note before sealing if desired. Attach an eye pin and coat with Mod Podge for added durability.
Personalization Tips
Write a tiny inspirational quote or initials on the miniature note inside the envelope.
Estimated Cost
$1–3
Skill Level
Beginner
Best Occasion
Valentine’s Day, anniversaries, or friendship gifts.
15. Crystal Gem Charm
Why It’s Special
Crystal gem charms bring elegance and sparkle to handmade jewelry. Whether using natural gemstones or glass crystals, they create sophisticated accessories suitable for everyday wear or special occasions.
Materials Needed
Crystal bead or gemstone, wire, jewelry pliers, jump rings, head pin.
How to Make It
Wrap the crystal securely using jewelry wire or thread it onto a head pin. Form a loop at the top with pliers and connect it to a jump ring or chain.
Personalization Tips
Choose birthstones or healing crystals that have personal meaning for the recipient.
Estimated Cost
$2–6
Skill Level
Beginner to Intermediate
Best Occasion
Necklaces, bracelets, birthdays, or handmade gifts.
16. Mini Ice Cream Charm

Why It’s Special
A miniature ice cream charm adds a playful and colorful touch to DIY jewelry. Perfect for summer-themed accessories, these adorable charms are fun to create and popular among children and adults alike.
Materials Needed
Polymer clay, sculpting tools, eye pins, oven, glaze, acrylic paint (optional).
How to Make It
Shape the cone and ice cream scoop from different clay colors before adding decorative sprinkles or sauce details. Insert an eye pin, bake according to the instructions, cool completely, and finish with a glossy glaze.
Personalization Tips
Create favorite ice cream flavors or use glitter clay for a sparkling dessert-inspired charm.
Estimated Cost
$2–5
Skill Level
Beginner
Best Occasion
Summer accessories, keychains, bracelets, or handmade gifts.
17. DIY Moon and Star Charm
Why It’s Special
A moon and star charm brings a dreamy celestial theme to handmade jewelry. Its elegant design symbolizes hope, dreams, and guidance, making it a meaningful accessory for bracelets, necklaces, or keychains. This timeless charm pairs beautifully with both minimalist and boho styles.
Materials Needed
Moon and star resin mold, epoxy or UV resin, glitter, gold foil, jump rings, UV lamp (if using UV resin).
How to Make It
Mix the resin and add fine glitter or gold flakes. Pour the mixture into the moon and star molds, remove any bubbles, and allow it to cure completely. Carefully remove the charms and attach jump rings for easy use.
Personalization Tips
Use glow-in-the-dark pigment or birthstone-colored glitter for a magical finish.
Estimated Cost
$2–5
Skill Level
Beginner
Best Occasion
Bracelets, necklaces, birthdays, or celestial-themed gifts.
18. Felt Heart Charm
Why It’s Special
A handmade felt heart charm is soft, lightweight, and easy to create. It makes a sweet addition to backpacks, keychains, zipper pulls, or Valentine’s Day gifts. The cozy texture gives this DIY charm a warm, handmade appeal.
Materials Needed
Felt sheets, embroidery floss, stuffing, scissors, needle, ribbon, key ring.
How to Make It
Cut two matching heart shapes from felt. Sew around the edges using embroidery floss, leaving a small opening to insert stuffing. Finish stitching, attach a ribbon loop, and connect the charm to a key ring.
Personalization Tips
Embroider initials, tiny flowers, or meaningful dates onto the front before sewing.
Estimated Cost
$1–3
Skill Level
Beginner
Best Occasion
Valentine’s Day, friendship gifts, or backpack charms.
19. Mini Mushroom Polymer Clay Charm
Why It’s Special
Mini mushroom charms are trendy and perfect for cottagecore, fairy garden, and woodland-inspired jewelry. Their whimsical appearance makes them popular additions to bracelets, necklaces, earrings, and keychains.
Materials Needed
Polymer clay, sculpting tools, eye pin, oven, glaze, acrylic paint (optional).
How to Make It
Shape the mushroom stem and cap separately before combining them. Add tiny texture details using sculpting tools, insert an eye pin, bake according to the clay instructions, and finish with a glossy glaze.
Personalization Tips
Use colorful mushroom caps, tiny white dots, or glitter accents for a magical woodland look.
Estimated Cost
$2–5
Skill Level
Beginner
Best Occasion
Nature-inspired jewelry, fairy-themed gifts, or craft fairs.
20. Tassel and Pearl Charm

Why It’s Special
Combining elegant pearls with silky tassels creates a sophisticated charm suitable for handbags, purses, keychains, or jewelry. This stylish accessory complements both modern and classic fashion.
Materials Needed
Silk tassel, pearl beads, head pin, jump ring, jewelry pliers, decorative spacer beads.
How to Make It
Thread the pearl beads onto a head pin and secure them with a wrapped loop. Attach the tassel beneath the pearls and connect everything to a jump ring or clasp.
Personalization Tips
Match pearl colors and tassels to seasonal fashion trends or special occasions.
Estimated Cost
$2–5
Skill Level
Beginner
Best Occasion
Purse charms, bridal gifts, or handmade accessories.
21. Mini Camera Charm
Why It’s Special
A miniature camera charm is a creative accessory for photography lovers, travelers, and scrapbook enthusiasts. It celebrates memorable moments while adding personality to bracelets, necklaces, or backpacks.
Materials Needed
Polymer clay, sculpting tools, eye pin, oven, glaze, acrylic paint.
How to Make It
Shape the camera body from black clay and add tiny buttons, a lens, and details using contrasting clay colors. Insert an eye pin before baking, then apply a glossy glaze once cooled.
Personalization Tips
Add initials on the back or create vintage camera designs inspired by favorite models.
Estimated Cost
$2–5
Skill Level
Intermediate
Best Occasion
Photography gifts, travel accessories, or keychains.
22. DIY Butterfly Resin Charm

Why It’s Special
Butterfly resin charms symbolize beauty, growth, and transformation. Filled with glitter, pressed flowers, or shimmering pigments, they create elegant accessories for necklaces, earrings, bracelets, and bookmarks.
Materials Needed
Butterfly silicone mold, epoxy or UV resin, glitter, dried flowers, tweezers, jump rings.
How to Make It
Arrange decorative flowers or glitter inside the butterfly mold before pouring in the resin. Cure completely, remove from the mold, and attach a jump ring for easy use.
Personalization Tips
Use pastel colors, holographic glitter, or birth flowers to create a one-of-a-kind charm.
Estimated Cost
$2–5
Skill Level
Beginner
Best Occasion
Spring jewelry, Mother’s Day, or handmade gifts.
23. Mini Donut Charm
Why It’s Special
A polymer clay donut charm is fun, colorful, and perfect for dessert-themed jewelry collections. Tiny frosting details and sprinkles make these charms especially popular among kids and craft lovers.
Materials Needed
Polymer clay, sculpting tools, eye pin, oven, glaze, dotting tool.
How to Make It
Roll the clay into a small ring shape and add a thin layer of colored clay as frosting. Decorate with miniature sprinkles, insert an eye pin, bake according to instructions, and glaze after cooling.
Personalization Tips
Create chocolate, strawberry, or rainbow sprinkle designs inspired by favorite bakery treats.
Estimated Cost
$2–4
Skill Level
Beginner
Best Occasion
Charm bracelets, earrings, birthdays, or handmade gifts.
24. Wire-Wrapped Stone Charm
Why It’s Special
A wire-wrapped stone charm transforms natural gemstones into elegant handmade jewelry without drilling. Each stone has a unique appearance, making every charm truly one of a kind.
Materials Needed
Small gemstone, jewelry wire, wire cutters, round-nose pliers, jump ring.
How to Make It
Wrap jewelry wire carefully around the stone to hold it securely while creating decorative swirls. Form a loop at the top for attaching a jump ring or necklace chain.
Personalization Tips
Choose healing crystals, birthstones, or stones collected from meaningful locations.
Estimated Cost
$3–6
Skill Level
Intermediate
Best Occasion
Necklaces, bracelets, gifts, or spiritual jewelry.
25. DIY Rainbow Resin Charm

Why It’s Special
A rainbow resin charm adds vibrant color and cheerful style to handmade jewelry and accessories. Its bright design symbolizes happiness, hope, and positivity, making it a favorite for bracelets, keychains, backpacks, and phone charms. This eye-catching charm is perfect for beginners learning resin crafting.
Materials Needed
Rainbow silicone mold, epoxy or UV resin, resin pigments, glitter (optional), mixing cups, jump rings, UV lamp (if using UV resin).
How to Make It
Mix small batches of resin with different colored pigments. Carefully pour each color into the rainbow mold one section at a time. Remove bubbles, allow the resin to cure completely, then remove the charm from the mold and attach a jump ring.
Personalization Tips
Add white clouds, holographic glitter, or tiny gold stars for a magical finish.
Estimated Cost
$2–5
Skill Level
Beginner
Best Occasion
Bracelets, keychains, birthday gifts, or Pride-inspired accessories.
26. Mini Cactus Polymer Clay Charm
Why It’s Special
A miniature cactus charm is an adorable accessory inspired by desert plants. Its simple shape makes it beginner-friendly while adding a fun touch to bracelets, earrings, backpacks, and phone charms.
Materials Needed
Green and brown polymer clay, sculpting tools, eye pin, oven, glaze, acrylic paint (optional).
How to Make It
Shape the cactus body from green clay and create a small flower pot using brown clay. Add texture with a sculpting tool, insert an eye pin, bake according to the manufacturer’s instructions, and apply glaze after cooling.
Personalization Tips
Decorate the cactus with tiny flowers, smiling faces, or colorful pots to match your style.
Estimated Cost
$2–4
Skill Level
Beginner
Best Occasion
Plant lover gifts, charm bracelets, or craft fairs.
27. Personalized Birthstone Charm
Why It’s Special
Birthstone charms are elegant keepsakes that celebrate birthdays and meaningful milestones. Featuring gemstones that represent each birth month, these personalized charms are timeless additions to necklaces, bracelets, and anklets.
Materials Needed
Birthstone crystal beads, head pins, jewelry pliers, spacer beads, jump rings.
How to Make It
Thread the birthstone bead onto a head pin and add decorative spacer beads if desired. Use round-nose pliers to create a secure loop before attaching the charm to a jump ring or bracelet.
Personalization Tips
Combine multiple birthstones to represent family members or add an engraved initial charm.
Estimated Cost
$2–6
Skill Level
Beginner
Best Occasion
Birthdays, Mother’s Day, anniversaries, or personalized gifts.
28. Mini Planet Charm
Why It’s Special
A miniature planet charm is perfect for astronomy enthusiasts and space-themed jewelry collections. Featuring colorful swirls and tiny rings, it creates a playful yet elegant accessory that stands out.
Materials Needed
Polymer clay, sculpting tools, eye pin, oven, glaze, metallic paint (optional).
How to Make It
Roll different clay colors together gently to create a marbled planet effect. Form a sphere, add a thin clay ring around the middle, insert an eye pin, bake, cool, and finish with a glossy glaze.
Personalization Tips
Design planets inspired by Saturn, Jupiter, or create imaginative fantasy planets with glitter accents.
Estimated Cost
$2–5
Skill Level
Beginner
Best Occasion
Science lovers, space-themed gifts, or keychains.
29. DIY Photo Frame Charm
Why It’s Special
A tiny photo frame charm lets you carry a favorite memory wherever you go. Whether attached to a bracelet, necklace, backpack, or keychain, this sentimental keepsake makes a meaningful handmade gift for loved ones.
Materials Needed
Mini frame bezel, printed mini photo, clear resin or glass cabochon, craft glue, jump ring, scissors.
How to Make It
Trim the photo to fit inside the miniature frame. Secure it with craft glue, then cover it with clear resin or a glass cabochon for protection. Allow everything to dry completely before attaching a jump ring.
Personalization Tips
Use family photos, pet pictures, travel memories, or inspirational artwork to make every charm unique.
Estimated Cost
$2–5
Skill Level
Beginner
Best Occasion
Family gifts, memorial keepsakes, friendship gifts, or personalized jewelry.