
30 Halloween Clay Crafts Magnets | Fun DIY Decor
Halloween clay crafts are a fun way to create small seasonal decorations with plenty of personality. Turning these crafts into magnets makes them useful for decorating refrigerators, magnetic boards, lockers, craft displays, and other metal surfaces.
Clay is especially suitable for miniature Halloween designs because it can be shaped into pumpkins, ghosts, bats, skulls, monsters, candy, and other recognizable forms. Depending on the material, you can use air-dry clay, polymer clay, or ceramic clay. For simple home crafts, air-dry and polymer clay are usually more convenient because they do not require a pottery kiln.
These Halloween clay crafts magnets can be painted in classic black and orange or customized with purple, green, white, red, and other Halloween-inspired colors. Below are 30 ideas organized into four categories.
Classic Halloween Clay Magnets:
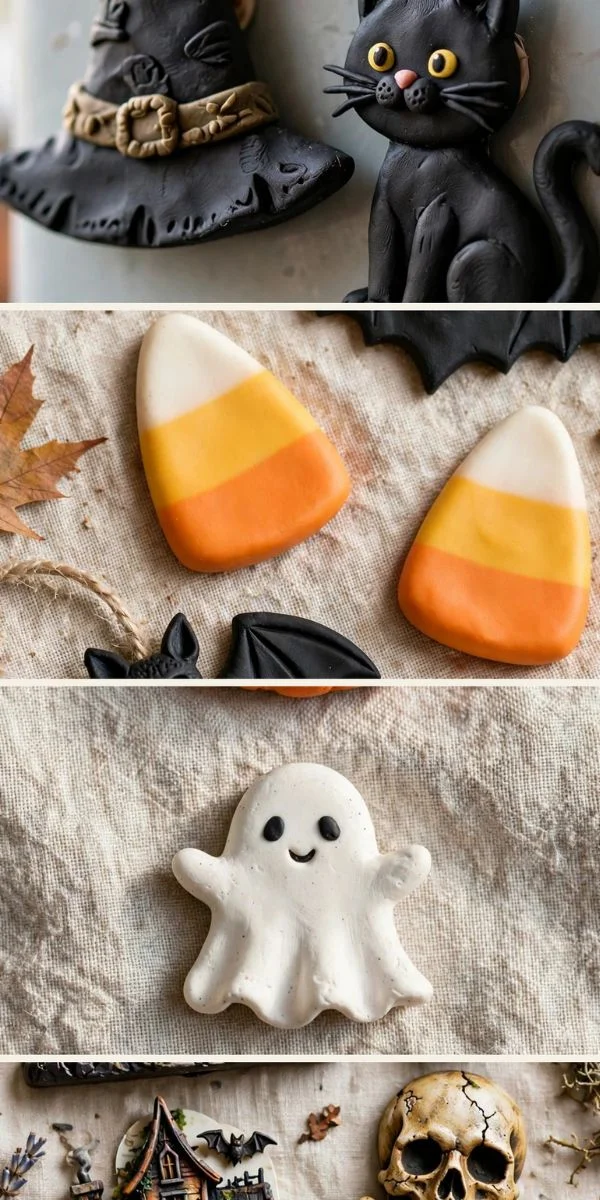
Classic Halloween symbols are easy to recognize and work especially well as small clay magnets. Their simple silhouettes also make many of them suitable for beginners.
1. Clay Pumpkin Magnet
A miniature pumpkin is one of the easiest Halloween clay crafts to turn into a magnet. Shape a small rounded piece of clay and add vertical grooves around the surface.
Finish it with orange paint and a green or brown stem. A tiny painted face can transform an ordinary pumpkin into a jack-o’-lantern.
2. Clay Jack-O’-Lantern Magnet
Turn a miniature clay pumpkin into a traditional jack-o’-lantern by adding triangular eyes and a small carved-looking mouth.
Black details contrast strongly with orange clay or paint. Several different facial expressions can be created to make a collection of unique magnets.
3. Clay Ghost Magnet
A ghost can be formed from a simple rounded clay shape with a flowing lower edge. The irregular bottom gives the little figure a floating appearance.
White or pale gray works well for the body, while tiny black eyes and a mouth provide the recognizable Halloween expression.
4. Clay Bat Magnet
A bat magnet can be created as a flat silhouette with pointed ears and curved wings. Keeping the shape relatively thin makes it easier to attach securely to a small magnet.
Black is the traditional choice, although dark purple or charcoal can provide a slightly softer appearance.
5. Clay Witch Hat Magnet
A miniature witch hat consists of a cone-shaped top and a flat brim. A narrow band around the hat adds another layer of detail.
Black clay paired with purple, orange, or green accents can create a classic Halloween palette.
6. Clay Skull Magnet
A skull magnet can be simplified into a rounded head with eye sockets, a nose opening, and a small mouth.
White or bone-colored clay gives it a traditional appearance, while gray shading can make the facial details more noticeable.
7. Clay Spider Magnet
A tiny spider is a playful Halloween design. Create a round body and attach or sculpt eight short legs around it.
Black is the obvious classic choice, but adding bright orange or purple details can make the magnet more decorative.
8. Clay Spiderweb Magnet
Instead of making a spider, create a miniature web using thin clay lines. The web can be attached to a small circular backing.
White, silver, or light gray can create contrast against a dark painted background.
Cute Halloween Clay Character Magnets:
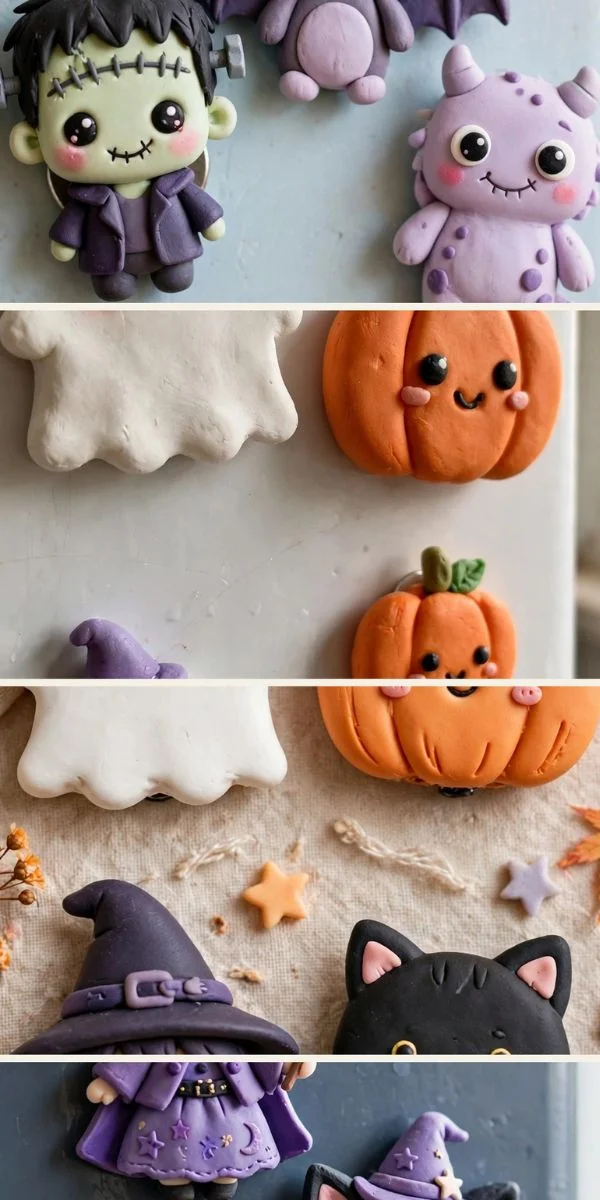
Halloween crafts do not have to look frightening. Cute characters are particularly useful for family-friendly decorations and children’s craft projects.
9. Cute Clay Ghost Magnet
Give a traditional ghost a friendly expression by using large rounded eyes and a tiny smile.
A small pumpkin, bow, or witch hat can be added as an extra accessory.
10. Clay Black Cat Magnet
A black cat is a classic Halloween character. Shape the head with pointed ears and add small facial details.
Yellow, green, or orange eyes can provide a strong contrast against the dark body.
11. Clay Witch Magnet
A miniature witch can be constructed from simple clay shapes representing the head, hat, hair, and clothing.
Use a pointed hat, dark dress, and colorful details to create a recognizable Halloween character without requiring complex sculpting.
12. Clay Frankenstein Magnet
Frankenstein-inspired magnets can feature a square head, dark hair, stitched facial details, and small bolts.
Green, black, gray, and purple make a strong color combination. Keep the facial features slightly exaggerated for a cute craft style.
13. Clay Vampire Magnet
A tiny vampire face can be designed with pale skin, dark hair, and small pointed fangs.
A black-and-red color palette works particularly well, although a cartoon-style vampire can use brighter colors.
14. Clay Mummy Magnet
A mummy magnet can be made from an oval body covered with thin raised clay strips or painted lines representing bandages.
Leave two small eyes visible between the strips for a cute Halloween expression.
15. Clay Monster Magnet
Create a completely imaginary monster using oversized eyes, horns, teeth, ears, or other unusual features.
This is one of the most flexible Halloween clay crafts because there is no single correct monster design.
16. Clay Zombie Magnet
A miniature zombie can feature messy hair, stitched details, and an exaggerated facial expression.
Green or gray skin combined with dark clothing can produce a recognizable zombie-inspired appearance.
Spooky Food and Halloween Object Magnets:
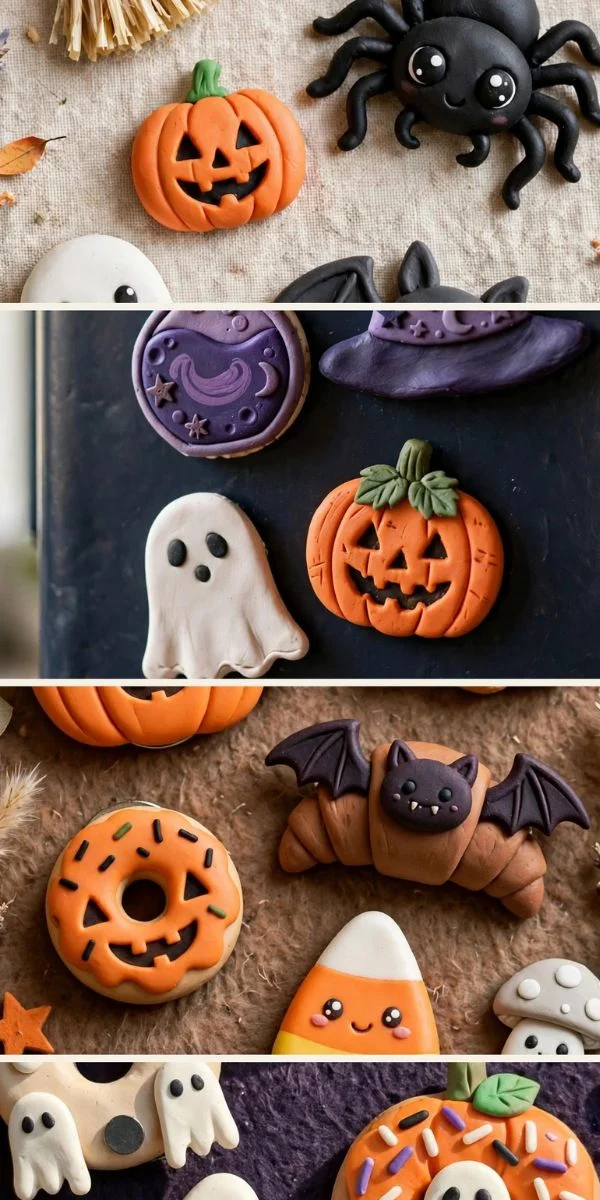
Food and Halloween objects provide a different direction for clay magnet designs. Their small size makes them ideal for miniature modeling.
17. Clay Candy Corn Magnet
Candy corn is easy to recreate because its shape consists of three main color sections.
Form a small triangular piece and divide it into white, orange, and yellow areas. The simple geometry makes this a beginner-friendly clay project.
18. Clay Candy Magnet
Create miniature wrapped candies using small pieces of clay. Twisted ends can be represented with sculpted details or painted patterns.
Use purple, orange, green, pink, and yellow for a colorful Halloween candy collection.
19. Clay Lollipop Magnet
A miniature Halloween lollipop can feature a round candy top attached to a tiny stick.
Swirls, stripes, and contrasting colors can make the candy look more detailed without requiring complicated sculpting.
20. Clay Potion Bottle Magnet
A tiny potion bottle is a fun Halloween object for a more mysterious theme. Create a small bottle shape and add a narrow neck.
Purple, green, or red paint can represent imaginary potion colors. A small label can add another decorative detail.
21. Clay Cauldron Magnet
A witch’s cauldron can be made from a rounded bowl-like shape with three small feet.
Paint it black and add green, purple, or orange clay details representing bubbling magical contents.
22. Clay Coffin Magnet
A miniature coffin can be formed as a simple elongated shape with angled corners. A small cross, decorative border, or painted pattern can add detail.
Dark brown, gray, or black creates a traditional gothic appearance.
23. Clay Haunted House Magnet
A tiny haunted house can combine a roof, windows, door, and crooked architectural details.
Black, gray, purple, and orange can create a spooky nighttime effect. Small clay ghosts or bats can be added around the house.
Cute and Creepy Halloween Creature Magnets:
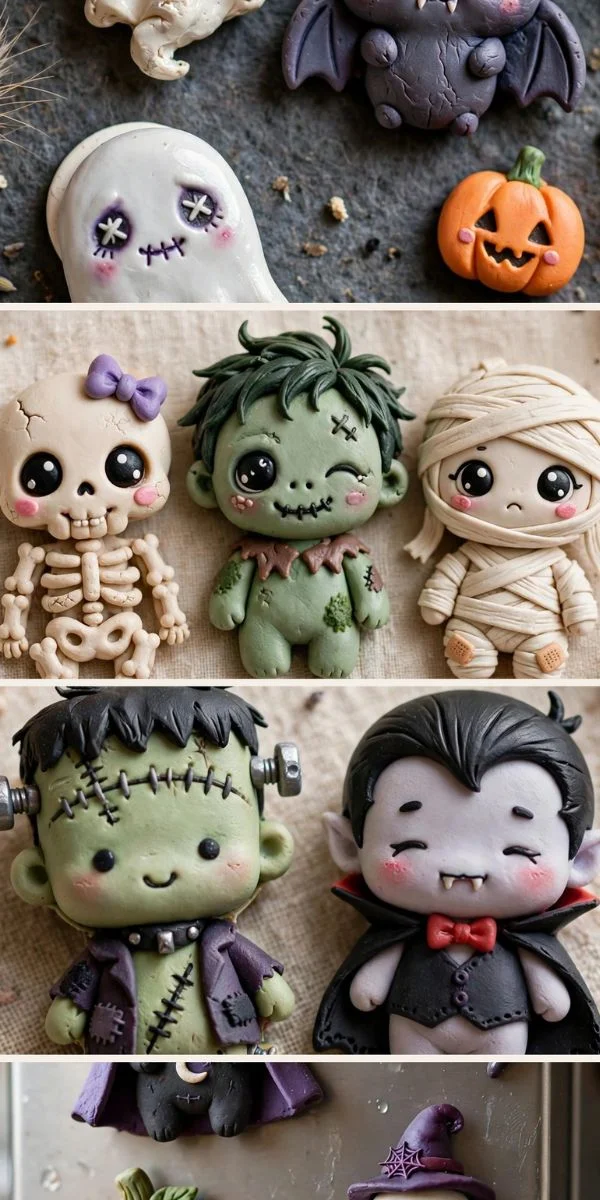
This category combines spooky creatures with playful miniature designs, giving you more options for decorating a Halloween-themed magnetic display.
24. Clay Eyeball Magnet
An eyeball is a simple round clay shape that can become surprisingly expressive.
Paint the white base first, then add a colored iris, dark pupil, and small red veins. Keep the magnet lightweight so it remains practical for a refrigerator.
25. Clay Monster Eye Magnet
Instead of making a realistic eye, create a large cartoon monster eye with an exaggerated iris and colorful details.
Green, purple, yellow, and blue can create a fun fantasy effect.
26. Clay Skeleton Hand Magnet
A miniature skeleton hand can be shaped using thin clay fingers and a small palm. Because the fingers are delicate, they should not be made unnecessarily thin.
White or gray provides the classic bone appearance, while black behind the details creates additional contrast.
27. Clay Werewolf Magnet
A werewolf face can feature pointed ears, textured fur, sharp teeth, and an exaggerated expression.
Gray, brown, and black are natural choices, but a cartoon werewolf can use almost any Halloween color combination.
28. Clay Devil Magnet
A small devil face can be created with horns, pointed ears, and a mischievous expression.
Red clay with black details is traditional, while purple or dark burgundy can produce a different aesthetic.
29. Clay Grim Reaper Magnet
A miniature Grim Reaper can be simplified into a hooded figure with a dark robe and tiny face.
Black and gray provide the classic appearance. Keep any small accessories securely attached, particularly if the magnet will be handled frequently.
30. Clay Halloween Witch’s Cat Magnet
Combine two Halloween themes by creating a cat wearing a tiny witch hat. The cat can have a rounded face, pointed ears, and a miniature hat.
Black, orange, purple, and green create a recognizable Halloween palette, making this a particularly cute option for seasonal refrigerator decor.
Choosing Clay for Halloween Magnets
Air-dry clay is convenient for simple Halloween crafts because it hardens naturally when exposed to air. It does not require kiln firing, making it accessible for home crafting.
Polymer clay is another popular option for miniature magnets. It remains workable until cured according to the manufacturer’s instructions, allowing detailed shapes and small features.
Ceramic clay can also be used, but it requires appropriate kiln firing. For small decorative refrigerator magnets, kiln-fired clay is generally more involved than necessary unless you specifically want a ceramic finish.
How to Make Halloween Clay Magnets
Start by choosing a simple Halloween shape and forming the clay into a compact piece. Keep the design relatively flat or lightweight so the finished magnet can be supported easily.
Add details while the clay is still workable. Pumpkin grooves, facial expressions, spider legs, stitches, and small decorative elements can be pressed or sculpted into the surface.
Allow air-dry clay to cure completely or bake polymer clay according to its manufacturer’s instructions. Once the piece is fully finished, attach a suitable craft magnet to the back using an appropriate adhesive.
Painting Halloween Clay Crafts
Acrylic paint is commonly used for decorating cured or fully dried air-dry clay. It can provide strong coverage and is available in many Halloween colors.
Black and orange are classic choices, while purple, green, white, gray, red, and metallic shades can create additional variations.
For tiny magnets, use small brushes for facial details. Painting the base color first and adding smaller details afterward can make miniature designs easier to control.
Making Durable Clay Magnets
The finished clay piece should be fully cured or dry before the magnet is attached. Moisture or incomplete curing can interfere with adhesive performance.
Choose a magnet appropriate for the weight of the craft. Larger or heavier pieces may need a stronger magnet than tiny flat decorations.
Allow the adhesive to cure completely before placing the magnet on a refrigerator or other vertical metal surface.
Halloween Clay Magnet Display Ideas
Arrange several magnets together to create a seasonal Halloween display. You can combine pumpkins, ghosts, bats, skulls, and candy for a colorful collection.
For a more coordinated look, use one color palette throughout the set. A black, white, and orange collection can create a classic Halloween appearance, while purple and green can produce a playful fantasy theme.
Frequently Asked Questions
What clay is best for Halloween magnets?
Air-dry clay and polymer clay are practical choices for Halloween magnets. Air-dry clay is convenient because it hardens without baking, while polymer clay can be useful for detailed miniature designs.
Can I make Halloween clay magnets without a kiln?
Yes. Air-dry clay and polymer clay allow you to make Halloween magnets without a ceramic kiln. Polymer clay still needs to be cured according to the product instructions.
How do you turn clay crafts into magnets?
First, complete and fully cure or dry the clay piece. Then attach a suitable craft magnet to the back with an adhesive designed to bond the relevant materials.
What Halloween shapes are easiest to make from clay?
Pumpkins, ghosts, candy corn, eyeballs, bats, skulls, and witch hats have relatively simple shapes and are good starting points for beginners.
Can children make Halloween clay magnets?
Yes, many clay magnet projects can be adapted for children. Adult supervision is recommended when using sharp tools, adhesives, ovens, or other materials that may present safety concerns.
What colors are best for Halloween clay crafts?
Black, orange, purple, green, white, gray, and red are commonly associated with Halloween. Combining two or three colors can keep a magnet set visually consistent.
How do I make a clay pumpkin magnet?
Shape clay into a small rounded pumpkin, create vertical grooves, and add a tiny stem. Once the clay is fully cured or dry, decorate it with paint and attach a magnet to the back.
Can I paint air-dry clay Halloween magnets?
Yes. Acrylic paint is commonly used once air-dry clay has completely hardened. Allow the paint to dry fully before handling or sealing the piece.
How can I make clay magnets stronger?
Keep the clay piece relatively compact and avoid making delicate sections unnecessarily thin. Use an appropriately sized magnet and a suitable adhesive, then allow the adhesive to cure fully.
Are clay magnets waterproof?
The answer depends on the clay and finish. Standard air-dry clay is generally not inherently waterproof, so finished magnets should be protected from prolonged moisture unless the specific product and coating are designed for water exposure.
Can I use ceramic clay for Halloween magnets?
Yes, but ceramic clay requires kiln firing and appropriate ceramic materials. After firing and glazing, a magnet can be attached to the finished piece.
How should I store Halloween clay magnets?
Keep them in a dry container away from excessive heat and moisture. Store small magnets separately if their surfaces could scratch or damage one another.