
How To Make A Wreath With Mesh | Easy DIY Guide 🌸
Learning how to make a wreath with mesh is an easy and creative way to make beautiful seasonal decorations for your front door, wall, fireplace, or party space. Decorative mesh is lightweight, flexible, colorful, and easy to shape, making it one of the most beginner-friendly materials for DIY wreath projects.
Whether you want to create a Christmas wreath, Halloween wreath, Easter wreath, fall wreath, or everyday door decoration, the basic technique is almost the same. With a wire wreath frame, mesh, ribbon, and a few decorative accents, you can create a full and eye-catching wreath without professional crafting skills.
This guide explains everything you need to know, from choosing supplies to attaching mesh and adding the finishing touches.
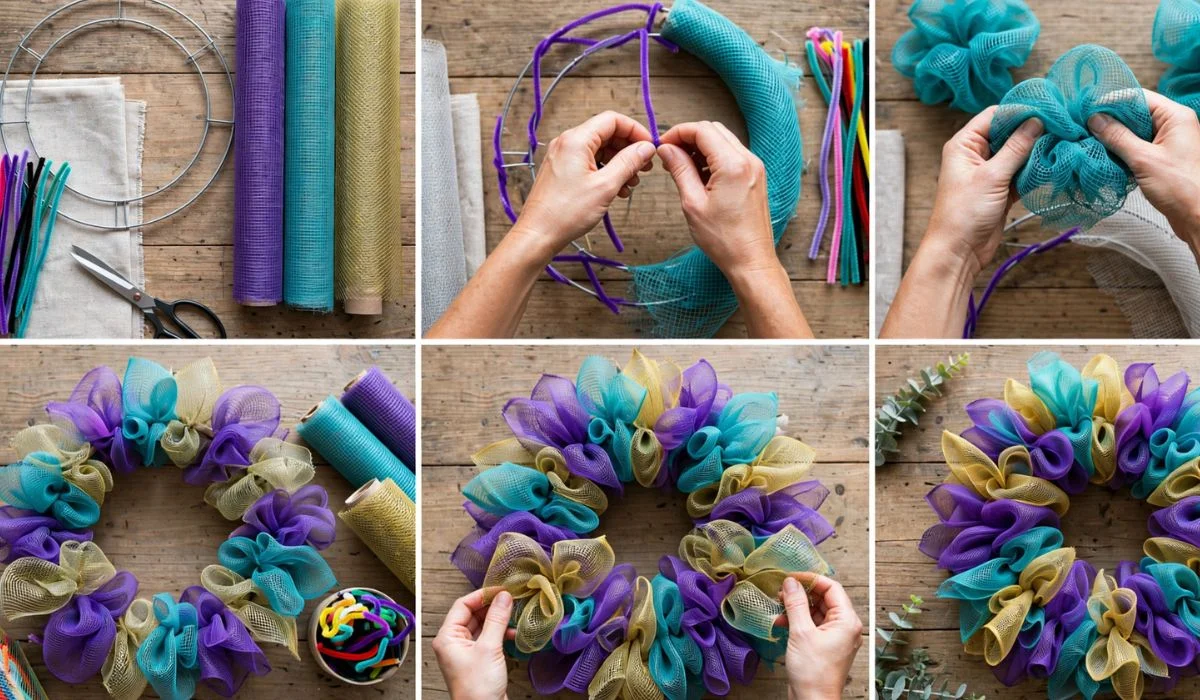
Supplies You Need to Make a Mesh Wreath:
Before starting your DIY mesh wreath, gather all your supplies. Having everything ready makes the process faster and easier.
Wire Wreath Frame
A wire wreath frame provides the foundation for your project. A 12- to 14-inch frame is a good size for beginners and works well for most doors.
Choose a frame with multiple wire rings if you want to create a fuller wreath. The extra rows make it easier to attach mesh, ribbon, and decorations securely.
Decorative Mesh
Decorative mesh is the main material for this project. It comes in many colors, patterns, widths, and textures.
For a traditional wreath, choose one main mesh color. You can also combine two different colors for a more interesting design.
For example:
- Red and white for Christmas
- Orange and black for Halloween
- Pastel colors for Easter
- Burgundy and gold for fall
- Blue and white for winter
- Green and gold for an elegant everyday wreath
Ribbon
Ribbon adds texture, color, and personality to a mesh wreath. Use two or three coordinating ribbons rather than choosing too many patterns.
Mixing a solid ribbon with a patterned ribbon usually creates a balanced look.
Floral Wire or Chenille Stems
These materials help secure the mesh and ribbon to the wreath frame. Chenille stems are particularly convenient because they are easy to twist and remove.
Decorative Accessories
You can personalize your wreath with almost anything that matches your theme. Consider using faux flowers, greenery, ornaments, bows, wooden signs, small pumpkins, butterflies, candy decorations, snowflakes, or seasonal figurines.
How to Make a Wreath With Mesh
Once your supplies are ready, you can begin creating your wreath. The process is simple and can be completed in several easy steps.
Step 1: Prepare Your Wreath Frame
Place the wire wreath frame on a clean, flat surface. Identify the inner and outer rows of wire.
If your frame has built-in tabs, you can use those to secure the mesh. Otherwise, prepare several chenille stems or pieces of floral wire around the frame.
Space your attachment points evenly so the finished wreath looks balanced.
Step 2: Cut the Mesh
There are several ways to work with decorative mesh. One of the easiest methods for beginners is cutting the mesh into sections.
Cut pieces approximately 10 to 12 inches long. You can make the pieces slightly longer if you want a larger and fluffier wreath.
Don’t worry if the edges curl or fray slightly. Decorative mesh naturally creates texture when gathered.
Step 3: Gather the Mesh
Take one piece of mesh and gently pinch it in the center. This creates a gathered or ruffled shape.
Try to keep the center pinched while the outer edges remain open. The result should look similar to a small bow or fluffy loop.
Avoid squeezing the mesh too tightly because you want to maintain its volume.
Step 4: Attach the Mesh to the Frame
Place the gathered center of the mesh onto the wreath frame. Secure it with a chenille stem or floral wire.
Twist the attachment securely, but don’t crush the mesh.
Continue gathering and attaching mesh pieces around the entire wreath frame. Keep the spacing relatively even to create a consistent appearance.
Step 5: Create a Fuller Wreath
For an extra-full wreath, attach mesh to both the inner and outer sections of the wire frame.
You can alternate the placement of each piece to create more dimension.
If you notice empty spaces, simply add another piece of mesh to that area. A full wreath generally looks more attractive when viewed from a distance.
Adding Ribbon to Your Mesh Wreath
Ribbon is one of the easiest ways to make a simple mesh wreath look more decorative.
Choose Coordinating Ribbon
Select ribbons that complement the color of your mesh. Using different widths and textures can make the finished wreath more interesting.
For example, combine a 2-inch patterned ribbon with a 2.5-inch solid ribbon.
You can also use wired ribbon because it holds its shape well and makes it easier to create attractive loops.
Cut and Layer the Ribbon
Cut ribbon pieces approximately 10 to 12 inches long.
Layer two or three ribbons together and pinch them in the middle. Attach the center to the wreath frame using the same method you used for the mesh.
Place ribbon bundles between the mesh sections.
Continue around the wreath until you achieve the desired fullness.
How to Fluff a Mesh Wreath
Fluffing is an important step that can completely change the appearance of your wreath.
After attaching all the mesh and ribbon, gently separate the loops with your fingers.
Pull some pieces upward, some outward, and others toward the center. This creates a fuller and more dimensional appearance.
Step back occasionally and look at the wreath from several angles. If one area appears thinner, add or reposition mesh and ribbon.
Adding a Large Bow
A large decorative bow can become the focal point of your wreath.
Use one or more coordinating ribbons to create the bow. Make several loops and secure the center tightly with floral wire or a chenille stem.
Attach the bow to the top, bottom, or side of the wreath.
For a traditional design, place the bow at the bottom. For a more modern look, try positioning it slightly off-center.
Adding Decorative Accents
Now comes the fun part: decorating your wreath.
Choose decorations that match the season or occasion.
Christmas Mesh Wreath
For Christmas, consider adding:
- Christmas ornaments
- Pine branches
- Snowflakes
- Bells
- Candy canes
- Mini gift boxes
- Christmas signs
- Red or green bows
A combination of red, green, white, gold, or silver can create a classic holiday appearance.
Halloween Mesh Wreath
For Halloween, use orange, black, purple, or green mesh. Add small pumpkins, bats, ghosts, spiders, skulls, or a spooky sign.
Fall Mesh Wreath
Fall wreaths look beautiful with warm colors such as orange, brown, burgundy, cream, and gold.
Add faux leaves, pumpkins, sunflowers, acorns, pinecones, or a seasonal welcome sign.
Easter Mesh Wreath
For Easter, pastel mesh works beautifully. Add colorful eggs, rabbits, flowers, carrots, butterflies, or a cute Easter sign.
How to Attach Decorations Securely
Small decorations can usually be attached using floral wire, chenille stems, or hot glue.
For heavier decorations, floral wire is usually a better choice because it provides additional support.
Insert the wire through the decoration and twist it around the wreath frame. Hide the wire beneath the mesh or ribbon.
Always check that decorations are firmly attached before hanging your wreath.
Common Mistakes to Avoid
Making a mesh wreath is relatively easy, but beginners sometimes make a few common mistakes.
Using Too Little Mesh
A wreath can look sparse if there isn’t enough mesh. If you want a fluffy appearance, use enough material to cover the frame evenly.
Pulling the Mesh Too Tightly
Tight mesh can make your wreath look flat. Keep the gathered sections loose enough to create volume.
Using Too Many Colors
Combining too many colors and patterns can make the wreath look cluttered. Stick to a simple color palette with two or three main colors.
Forgetting to Fluff
Don’t skip the fluffing stage. Even a well-made wreath can look flat until the mesh and ribbon are properly separated and shaped.
Easy Tips for a Professional-Looking Wreath
Use wired ribbon whenever possible because it holds its shape and makes beautiful bows.
Choose a strong focal decoration instead of covering every inch of the wreath with accessories. A large sign, bow, or seasonal centerpiece can give the wreath a polished appearance.
Keep your colors coordinated and repeat the same colors throughout the design.
Finally, step away from your wreath several times while working. Viewing it from a distance makes it easier to identify empty areas or sections that need more decoration.
Final Thoughts:
Learning how to make a wreath with mesh is a fun DIY project that allows you to create personalized decorations for almost any season. The basic process is simple: prepare a wire frame, gather and attach the mesh, add coordinating ribbon, fluff the materials, and finish with decorative accents.
Once you understand the basic technique, you can experiment with different colors, ribbons, textures, signs, bows, and seasonal decorations. You can make a new mesh wreath for Christmas, Halloween, Easter, fall, birthdays, weddings, or everyday home décor.
The best part is that you don’t need advanced crafting skills. Start with a simple design, practice gathering and attaching the mesh, and gradually experiment with more detailed decorations. With a little creativity, you can make a beautiful handmade wreath that adds a welcoming touch to your home.